We use cookies to improve the services we offer you. By continuing to browse this site, you consent to keep them in accordance with our Privacy Policy.
×We use cookies to improve the services we offer you. By continuing to browse this site, you consent to keep them in accordance with our Privacy Policy.
×Don’t waste your precious time – record important things now!

 71,775
 10 min

The moment an idea flashes into your mind, you pull out your phone and start recording. Let us guess: there’s a big chance you’re holding your cell phone vertically when you do that. You’d get away with it if the video is only meant for Instagram stories. But what if you want it on YouTube or your personal website? In this case, you’ll have to figure out how to make that vertical video horizontal. Read on to find the best software to do that.
The most tools to rotate your video you’ll find in desktop video editing programs. Here are the best pieces of software to do that and instructions on how to turn a vertical video horizontal on a Windows PC or Mac.
This feature-packed editing program is powerful and intuitive. Movavi Video Editor Plus gives you incredible functionality with a simple interface that’ll have you up and editing in no time. That’s why it’s perfect for both simple tasks like rotating a video clip and more complex things like editing a creative movie with special effects. Here’s how you rotate your vertical video and make it horizontal:
1. Drag your video to the timeline.

2. Select it and rotate it 90 degrees by clicking the Rotate button on the toolbar – the circular symbol with an arrow.

3. Click the Crop button, which is also on the toolbar.
4. Adjust the frame, zooming in or out as needed, to exclude the black bars completely, so there are no frames on the final video.

5. Click Apply.
Another option is to crop the video. This is applicable in those cases when you need a part of the image rather than the full picture. For example, you might have a full body shot, but you only need to include the face of the person. Here’s what you can do in this case:
1. Add your video to the timeline.
2. Click the Tools menu.

3. Under Video Editing click Crop and Rotate.

4. Frame your shot as you’d like and click Export. Choose the format you want the video to be saved in, and then hit Start.

Note that this method is really just zooming in on your video so it will reduce the quality, therefore this isn’t the best way to go with videos shot at low quality.
VLC Media Player is a fantastic free video player best known for two things: the sheer amount of codecs/file formats it can play and the iconic traffic cone logo. In addition to that, VLC also enables you to rotate your videos. Here’s how:
1. Click Tools on the top menu.
2. Choose Effects and Filters.
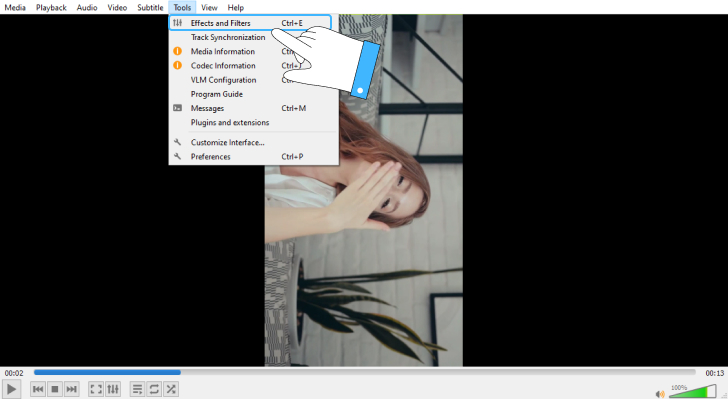
3. In the popup menu, go to the Video Effects tab.
4. In the Video Effects tab, click the Geometry tab.
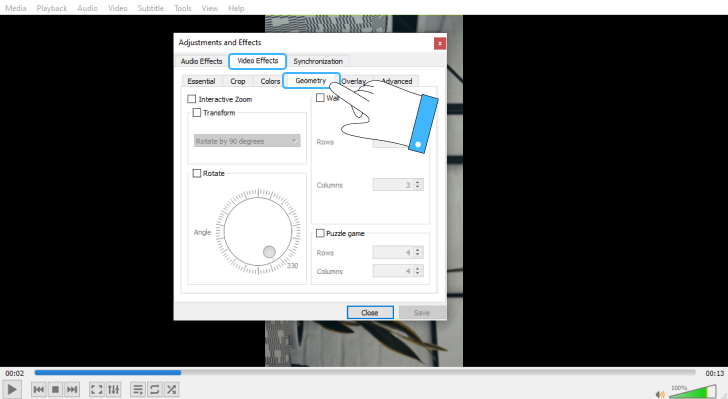
5. Check the Transform box.
6. In the drop-down menu, choose which way to rotate your video and by how much, i.e. Rotate by 90 degrees.
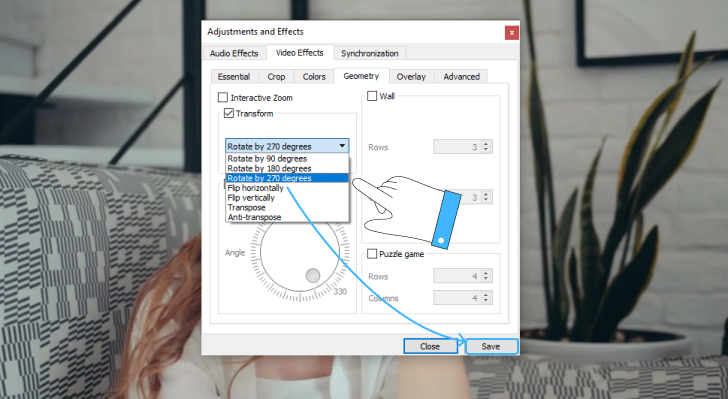
7. Click Save.
iMovie is an Apple-only product. The native editing software for the macOS ecosystem, this app has been around for over two decades and is a straightforward, intuitive piece of video editing software. It can’t boast advanced video editing tools, it does have great easy-to-use tools for simple tasks like rotating a video. The best thing about iMovie is that it comes pre-installed on your Mac so that you don’t need to download or look for anything and can go straight to adjusting your footage.
To convert your iPhone video to horizontal with iMovie, take these steps:
1. Upload the video you want to edit to the app.

2. Click Create New Movie and drag and drop your clip to the timeline.

3. Click the Crop tool and then Crop to Fill or Rotate (clicking clockwise or counterclockwise) depending on your needs.

4. Click Apply, the blue circle with the check, to save the change.

Again, and as with Movavi, if you opt for Crop to Fill this is literally zooming in on your footage and will cause some loss in quality.
If you can’t or don’t want to download a video editing app to your computer or smartphone, you don’t have to. There are plenty of good online options to help you fix your vertical video.
Here’s how to change vertical video to horizontal orientation using them.
Fastreel by Movavi lets you bypass the downloads and do some light editing right from your browser. A sleek tool that packs in a truly massive amount of capability; it allows cutting, merging, compression, cropping, speed changes, adding music, and more. And that’s barely scratching the surface. You can start from just your raw video or use one of the many stylish templates.
To rotate a video so you can view it in full screen, take these simple steps:
1. Upload your file from your computer or Dropbox – up to 500 MB (remember, you can also use Fastreel to compress a video).

2. Rotate your video clockwise or counterclockwise, left or right, with a click – each click being 90 degrees.
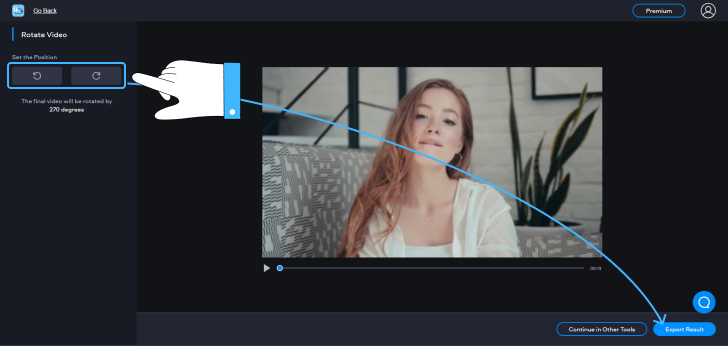
3. Click the Export result button to download the final clip.
Similar to Fastreel, Clideo provides a suite of robust video editing tools, including a meme-maker, designed to assist you in creating videos swiftly and without a headache, almost like having an AI assistant at your side.
Here’s how you fix videos taken in the portrait orientation that you’d rather have in the landscape using Clideo:
1. Upload the clip from your computer, Dropbox, Google Drive or a link – they have the same 500 MB file limit.

2. Rotate the video to the form you’d like it in.

3. Click Export.

If you’re rushing, you can just download a mobile app on your smartphone and adjust your vertical video in it. Here are a couple of great apps for that:
Essentially a full-featured editing suite for smartphones, Movavi Clips makes editing videos as simple and fun as it can possibly be. It allows you to edit, add music or voiceover, adjust speed, add stickers and text, and more. At the same time, it’s extremely intuitive, effortless, and hassle-free.
Your vertical video can become horizontal in just a couple of steps:
1. Tap the plus icon to make a new video.
2. Pick if you want to use video or still images (in this case, click the video camera icon).
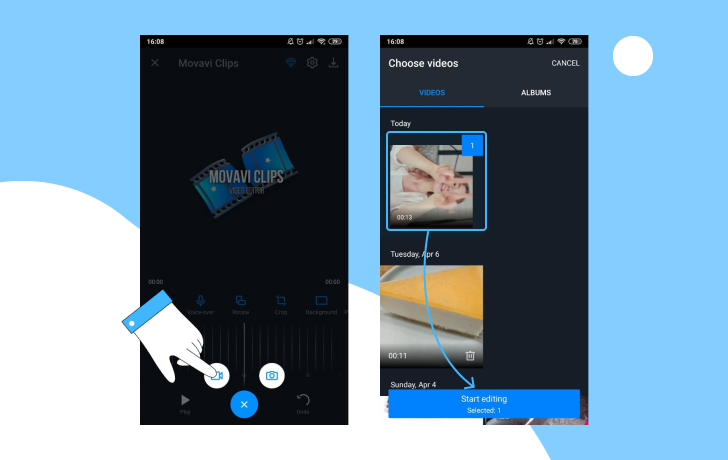
3. Select your video(s) and click Add.

4. Tap Rotate to make your clip horizontal.
A truly stellar and powerful choice for video editing on the go, InShot is loaded with professional features and also sports an easy-to-use interface. You can finish your entire project, complete with titles, transition effects, and music.
To make that pesky vertical video horizontal, here’s what you do:
1. Click Video on the homepage.

2. Select your clip(s) and click the green checkmark.
3. Click Canvas on the bottom menu to select your aspect ratio, 16:9 in this case.
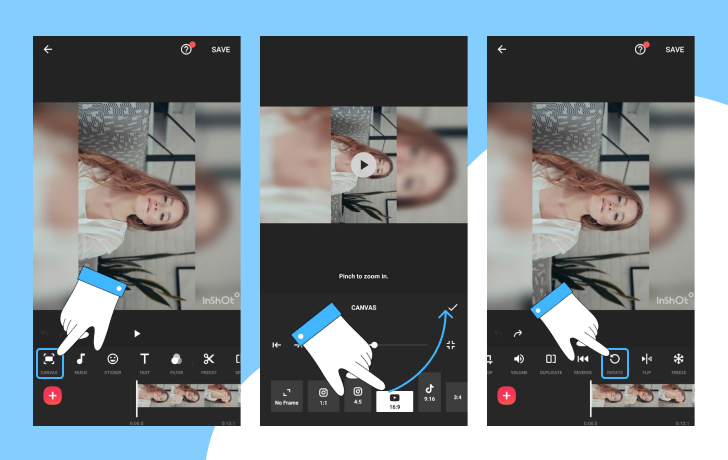
4. You can either pinch and zoom in or use the scroll wheel to zoom in to make your shot fill the screen, then click the checkmark.
Or after clicking Canvas and selecting 16:9, scroll over and click Rotate.
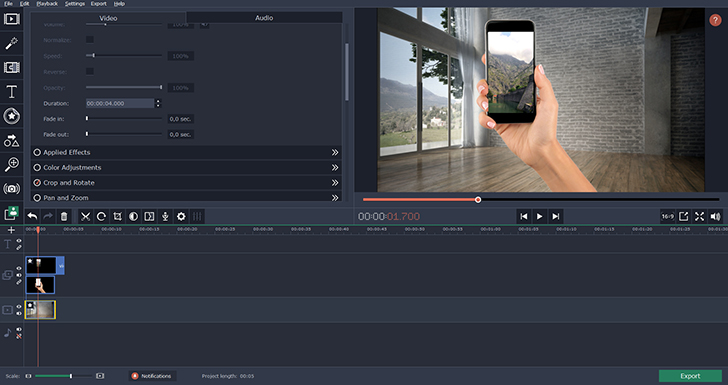
A smartphone video looks best on a smartphone. So why not combine the two? You can place your video on a picture of a hand holding a phone. This will look great for promotion videos or just Instagram stories that you’ve decided to edit together in a cute movie.
Here’s how you do that trick in Movavi Video Editor Plus:
1. Find the right template in Google by searching with keywords like “hand holding a smartphone. Look for a PNG: it’s much easier to work with in video editing software. Besides, zooming in on a PNG does less harm to the quality.
2. Drag the template to your timeline.
3. Place your vertical video directly onto the screen of the smartphone in the picture.
3. You can leave the image of the hand floating in the middle of nowhere, or you can come up with a background. Use the hack with the blurred image in the background or apply a few graphic elements.
All in all, accidentally shooting vertical footage isn’t the end of the world. No matter if you prefer desktop software, doing it online, or even right on your phone – there are really easy ways to get that video horizontal in no time. Whether you use Chrome or some other browser, run iOS or Android, use Windows or Mac, the options above have you covered.