
Take advantage of our special 10% discount for all our blog readers!
We use cookies to improve the services we offer you. By continuing to browse this site, you consent to keep them in accordance with our Privacy Policy.
×
 26,739
 11 min
Looking for cool iMovie effects that will help you create more impressive, professional-looking videos? With the right effects, such as iMovie filters and iMovie fade-in transitions, you can change the whole look and feel of your videos. In this article, we discuss iMovie’s visual effects and how they work. Read on for step-by-step instructions to learn how to add cool iMovie effects, which ones of them are the best for your purposes and an alternative to iMovie for your video editing projects.
So, what are the top 10 effects in iMovie? While there are a lot of free iMovie effects available, some are more useful than others. Our picks for the top effects for video makers include:
| Effect | What it’s best for |
| Green/blue screen | Change the background to anything you want without traveling to exotic filming locations. |
| Steadycam | Produce sleeker, more professional-looking videos by removing shakes, wobbles, and vibrations. |
| Filters | Give videos a specific look and feel with warmer colors or an old-time film look. Apply color correction in no time |
| Transitions | Create a polished look for video clips with smooth, professional transitions. |
| Flip, crop, and rotate | Adjust the size, shape, and orientation of video clips to fit specific platforms and focus on the parts of the shot that matter most. |
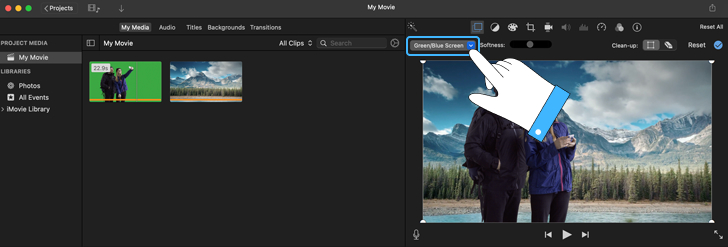
1. Green/Blue Screen
Green/blue screen capabilities make life a lot easier (and cheaper) for video makers on a budget. This feature enables you to shoot videos in front of a green or blue screen and then use iMovie to edit in the background of your choice . You can also cut any single color out of your background, or make that color transparent in your video – which opens up a lot of opportunities for some cool visual effects.
2. Steadicam
Steadicam lets you smooth out shakes, wobbles, and vibrations in a video clip. Stabilization is a great tool for video creators who shoot a lot of hand-held clips, especially if they want their videos to look sleeker and more professional. With the stabilizing effect, you can edit out mistakes or fix shaky footage without spending time and effort on re-shoots.
3. Transitions
Transitions enable you to shift from one clip to the next one smoothly and professionally. You can choose from a range of different transition options, including fade-in/fade-out, zoom, dissolve, and many more. The right transition between clips can take a video to the next level and give it a more finished look. Play around with zooming between shots, adding a cross-fade effect, and other transitions to find the right solution for your movie.
4. Split Edit
Need to sync audio with two separately-cut clips that you’re joining together? Split edit enables you to choose the audio track you want for your cut-together clip and sync it exactly where you need it. You can use this to create a single voiceover or music track running over multiple clips, or to otherwise sync audio without the need to do everything in a single shot.
5. Flip, Crop, and Rotate
Flip, crop, and rotate features let you easily manipulate the size and orientation of a video clip. Whether you’re cropping a larger image or video for Instagram or TikTok, or you’re flipping the image so that it mirrors itself, this effect comes in handy for a lot of video creators. These three features are simple, so they might not be the flashiest iMovie video effects, but they really come in handy when you’re getting all the details right on a video.
6. Day to Night
Shooting videos at night can be almost impossible, but you can simulate darkness with the Day to Night video effect in iMovie. Day to Night is a classic effect that lets you create the illusion of a nighttime scene. Filmmakers have been shooting “day for night” and creating this effect for decades, and modern video editing software lets you do it at home. Shoot your videos any time of the day that works best for you, and then “fix it in post” using the day to Night feature.
7. Filters
Filters give you the power to create different moods for your videos. Also, it’s the easiest and fastest way to add color correction to your footage. If your video’s lighting is too harsh, you might add a warm filter to tone it down. Or you can create an old-time movie feel or any number of other atmospheric changes with a simple filter. Plus, when you add a filter directly to your video, you don’t have to worry about trying to align different filters from different platforms, like Instagram, TikTok, YouTube, and Facebook.
8. Dolly Zoom
Dolly zoom creates a cool optical illusion, where everything in the foreground appears motionless while the background moves toward you. It’s a cool zoom effect that’s hard to capture in-video but easy to apply when editing. Give your video a little extra style with a dolly zoom effect in a dramatic moment – or when you want to draw the audience’s full attention to one specific part of a shot.
9. Cutaways
Cutaways are shots that show one or more different scenes in between the main scene that’s playing out. Popular cutaway shots include flashbacks or scenes of another character doing something related to what the characters in the main scene are discussing. You can easily splice clips together to create this video effect in iMovie.
10. Split Screens
Split screens let you add multiple images or video clips to play on the screen at the same time. You might use this if you’re showing a conversation between different streamers in a remote roundtable discussion, or to show a comparison between two scenarios. Musicians use this effect to make a fun music video out of multiple separately shot clips. Split screens are a great solution for a lot of group videos, comparison videos, and creative clips for social media.
First of all, let’s see how to add effects in iMovie. It depends on the effects that you’re going to use. Adding an iMovie filter, for example, is a little bit different from changing the background using the chroma-key feature or creating the dolly zoom effect. We’ll walk you through each of these processes as we explore free iMovie effects and how to use them.
To add iMovie filters, download iMovie and follow the installation instructions. Then:
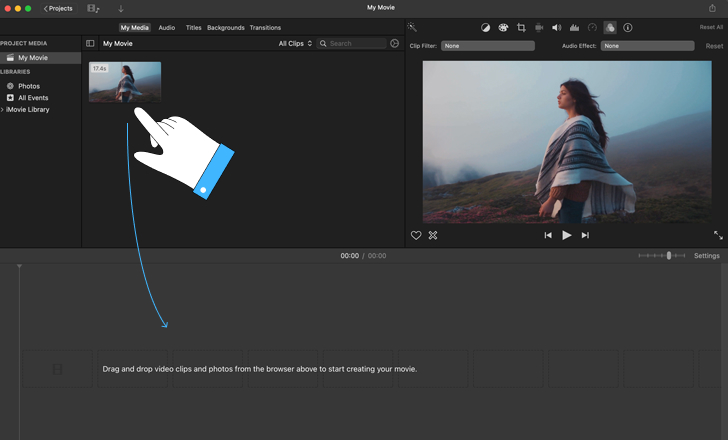
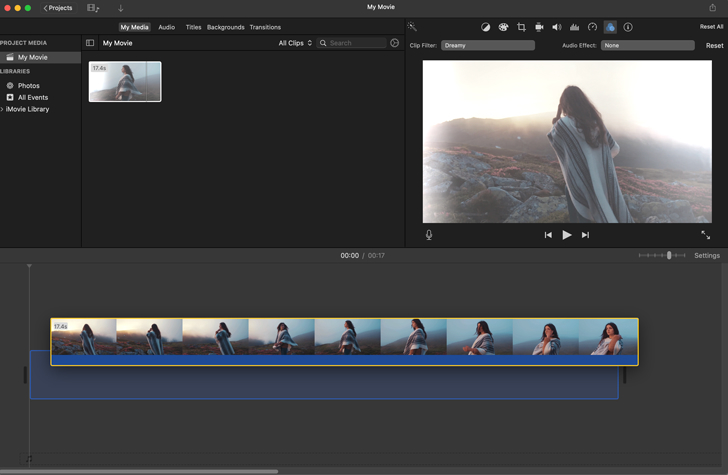
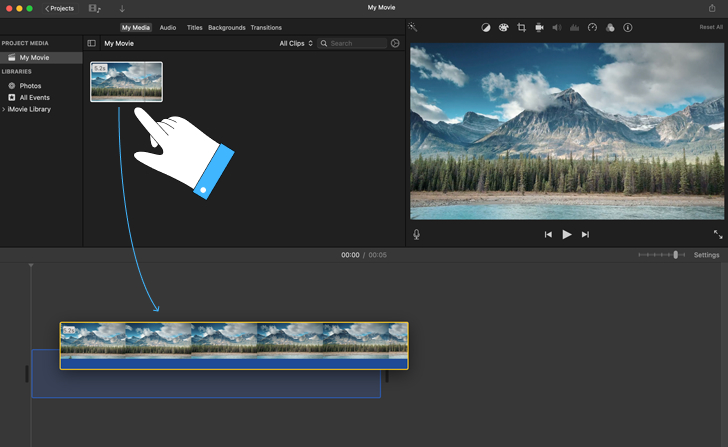
1. Select the clip that you want to enhance and drag it to your editing timeline in iMovie.
2. Tap the Filters button, and a selection of filter options will appear.
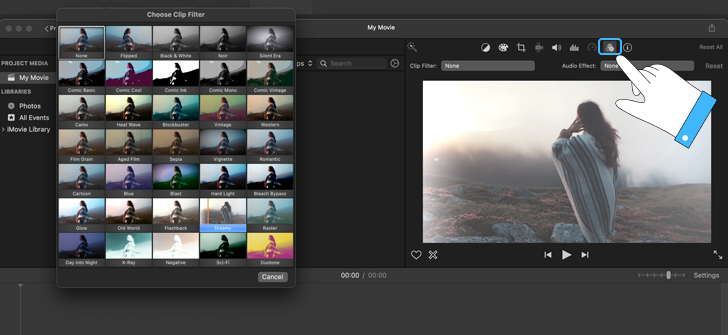
3. Drag the filter you want to the clip you want to apply it to. If you aren’t happy with the filter, you can delete it and drag another into its place.
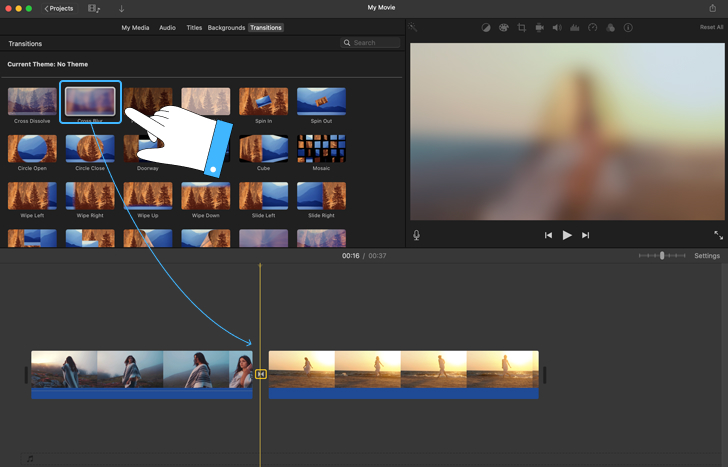
Adding transitions in iMovie is similar to adding filters for iMovie:
1. Drag two or more clips to your editing timeline.
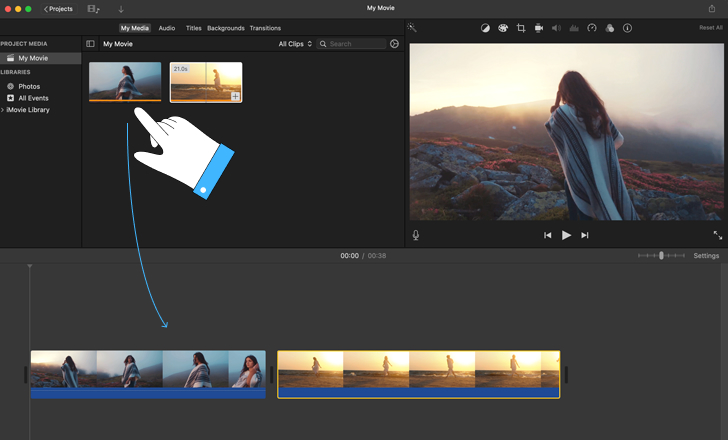
2. Tap the Transitions button, and select the transition you want to put between your clips.
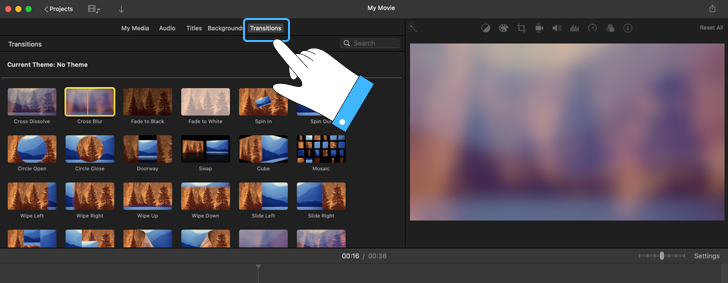
3. Drag the transition between the two clips you want to transition between.
As you learn how to add special effects in iMovie, you’ll definitely want to know how to change backgrounds in this program, too. Here’s how you do it:
1. Go to File and select Import Media.
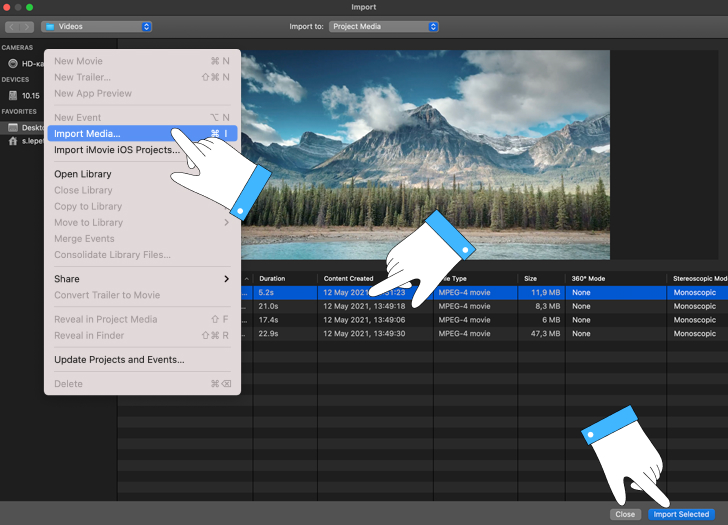
2. Select the video or image you want to import as your video’s background.
3. Drag that clip or image to the timeline before you pull in the green-screen video clip. It should be your bottom timeline.
4. Drag the clip(s) you shot on a green screen into the iMovie. It should be on the top video track.
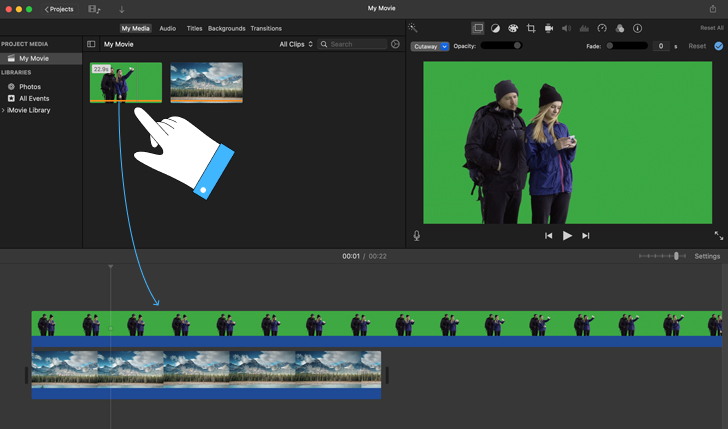
5. Click the Video Overlay Settings icon. It looks like a square laid over a dotted square. When you click on it, a dropdown box will appear.

6. Choose Green/Blue Screen from the dropdown menu.
If iMovie video effects are not enough for you and you’re looking for an alternative solution to adding animation effects and other visual effects to your videos, you may want to try Movavi Video Editor Plus. Movavi Video Editor Plus is a robust video-editing tool that allows users to create professional, polished, stylish, and cool videos with a large suite of effects, tools, and features. Plus, with a free trial period, there’s no risk in checking out this iMovie alternative.
Some users find that adding effects in Movavi Video Editor Plus is more straightforward and intuitive than iMovie. Instead of hunting for different effects tools to figure out how to add special effects for iMovie, in Movavi Video Editor Plus, effects are grouped in a library for easy drag-and-drop editing. To add effects in Movavi Video Editor Plus, follow these simple steps:
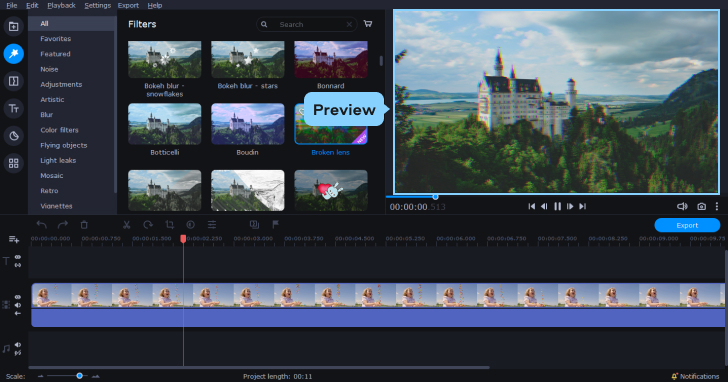
1. Open the effects library by clicking the Filters button.
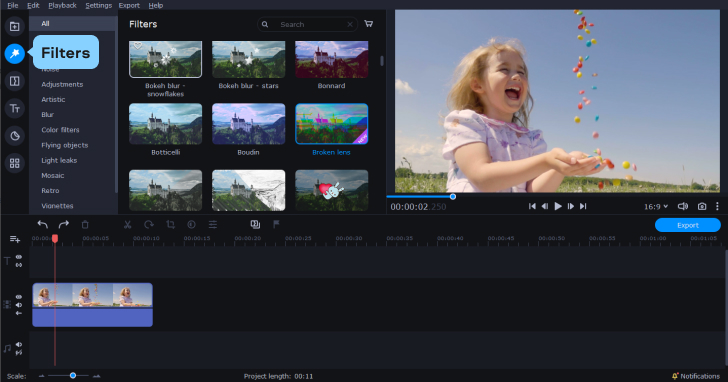
2. Browse through the list of effects and find the one you want to use. You can click a thumbnail to see a preview of the effect, or you can select from the list that pops up in the middle of the screen.
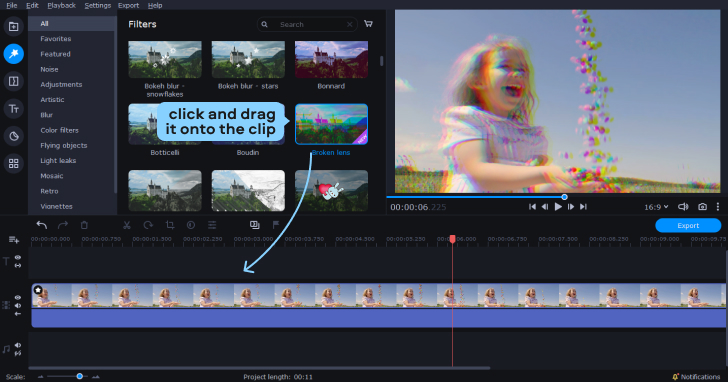
3. Once you’ve chosen the effect you want to use, click and drag it onto the clip where you want to use it. Or you can click on a clip in your timeline, click the Apply button, and choose the effect you want to use.
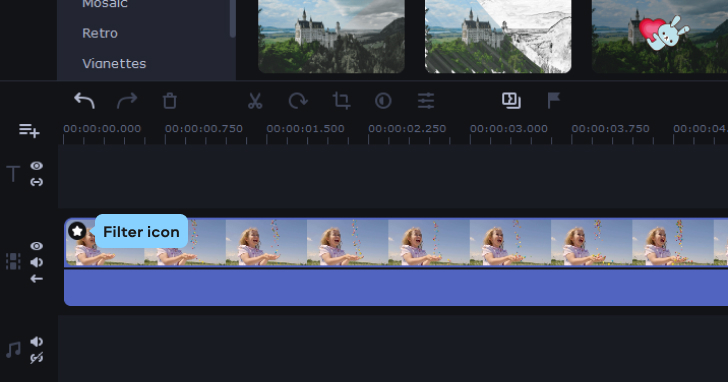
4. Notice that a star icon will appear on any clip you’ve added an effect to.
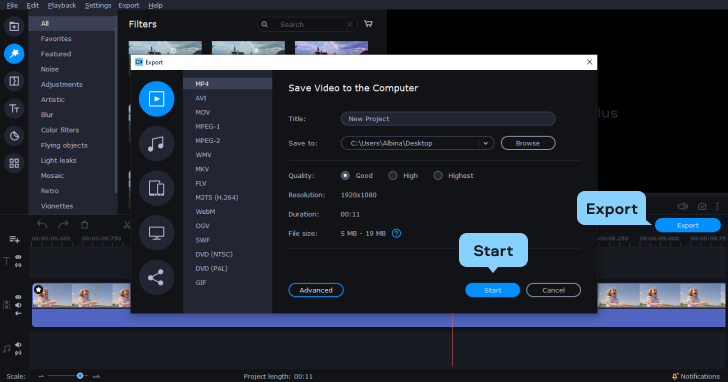
5. When you’re done, export and save your video in whatever format you prefer.
That’s it! Now you know how to add effects in iMovie. We hope our tips help you create awesome videos. Good luck 😉